Datasheet AlarmManager
KentixONE Operating mode
| SiteManager Operation | Stand-alone operation |
|---|---|
Overview
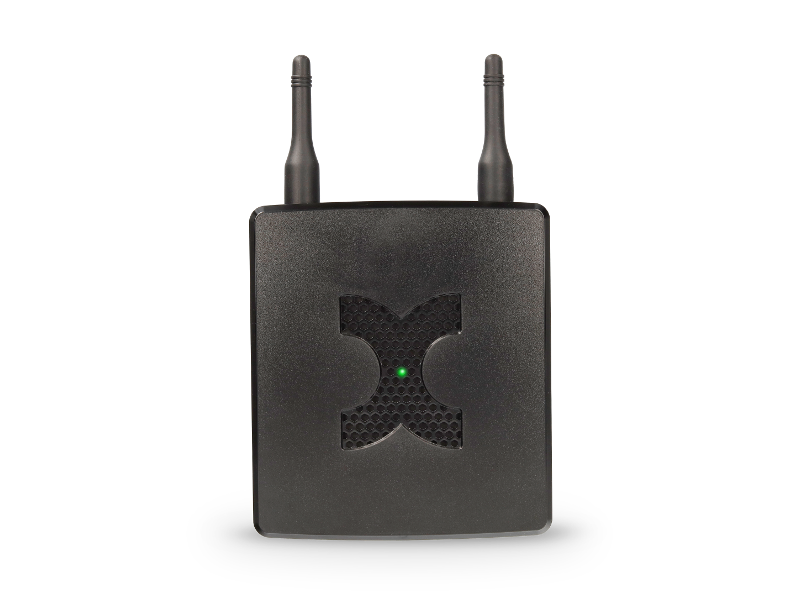
The Kentix AlarmManager is the central control unit of a Kentix installation with up to 30 Kentix devices. All devices used for access control(SmartAccess), building security(SmartMonitoring) and IT protection(SmartPDU) are controlled by the AlarmManager and their data evaluated.
It manages all master data such as users, access, alarm groups as well as devices and their sensors.
The AlarmManager reports dangers specifically by email and with the built-in GSM modem by SMS. If the power supply fails, it can still send an alarm via SMS thanks to an emergency buffer.
For operation, they require a POE-capable switch or injector.
Various mounting brackets are available for installation.
Buffer function in case of power failure
The AlarmManager has maintenance-free backup capacitors to supply it with power for a certain period of time in the event of a power supply failure and to send an e-mail/SMS message about the power failure.
For continuous operation, we recommend operating the AlarmManager on a UPS-powered switch and additionally monitoring it.
The external power supply can be provided by using a MultiSensor-ROOM on a socket without a UPS supply.
Safety instructions
No modifications of any kind, other than those described in an appropriate manual, are permitted to Kentix GmbH products.
Certain levels of protection must be provided when installing Kentix equipment.
Observe the relevant regulations for installations in the respective environment.
Only operate the products within the defined temperature range.
The instructions should be passed on to the user by the person carrying out the installation.
Kentix accepts no liability for damage to the equipment or components resulting from incorrect installation. No liability is accepted for incorrectly programmed units.
Kentix shall not be liable in the event of malfunctions, damage to property or other damage.
Protect moisture, dirt and damage.
Only operate the products within the defined temperature range.
Installation and battery replacement may only be carried out by trained personnel in accordance with the instructions.
Do not charge, short circuit, open or heat batteries.
When inserting the batteries, pay attention to the correct polarity.
The devices must always be operated with the batteries intended for the product.
When changing batteries, always replace all batteries.
Dispose of old or used batteries properly.
Keep batteries out of the reach of children.
Connection and operating elements
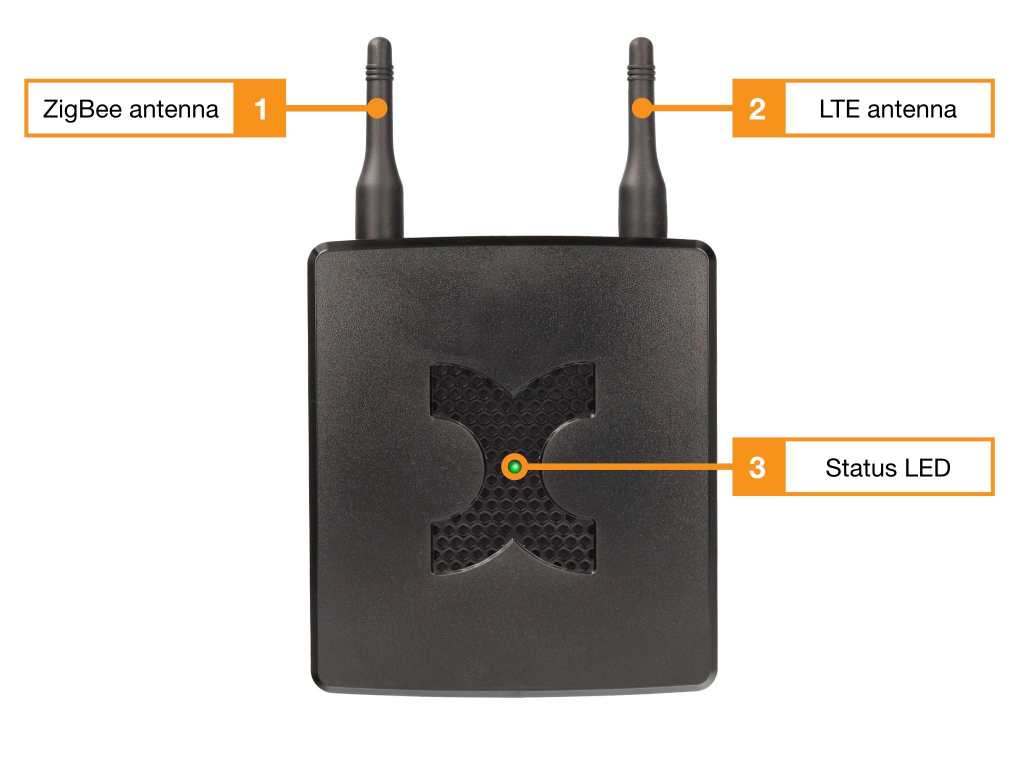
- ZigBee antenna (SMA screw antenna)
- LTE antenna (SMA screw antenna)
- Status LED
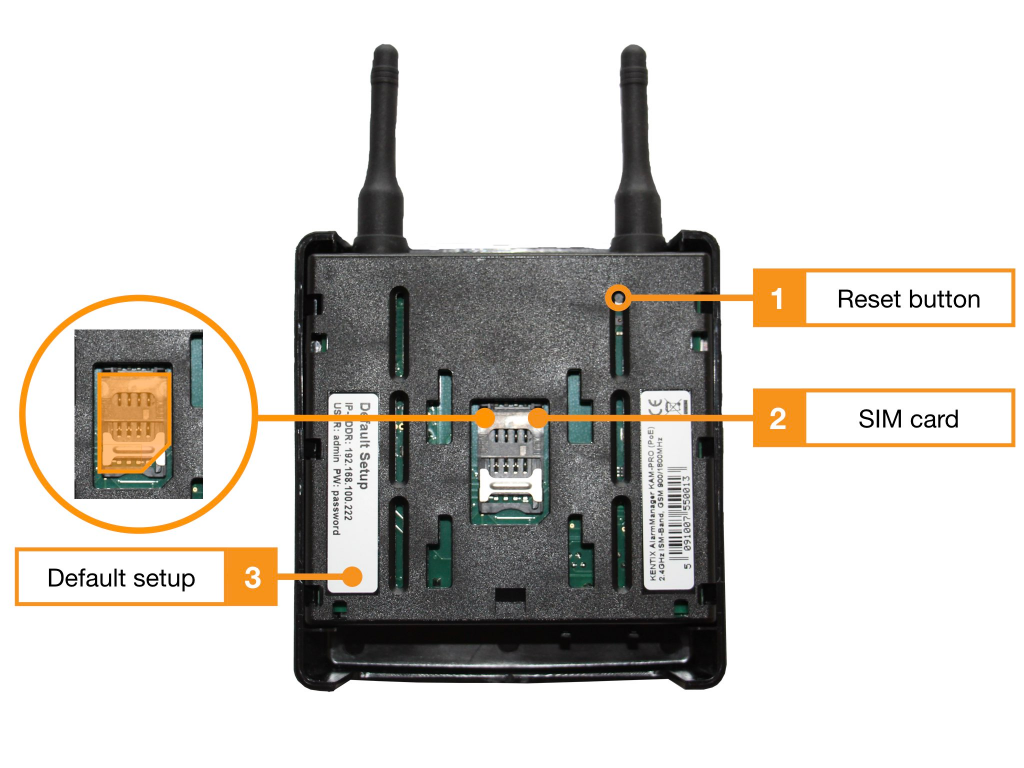
- Reset button(reset to factory settings)
- SIM card slot for standard or mini SIM
- Sticker Default Setup
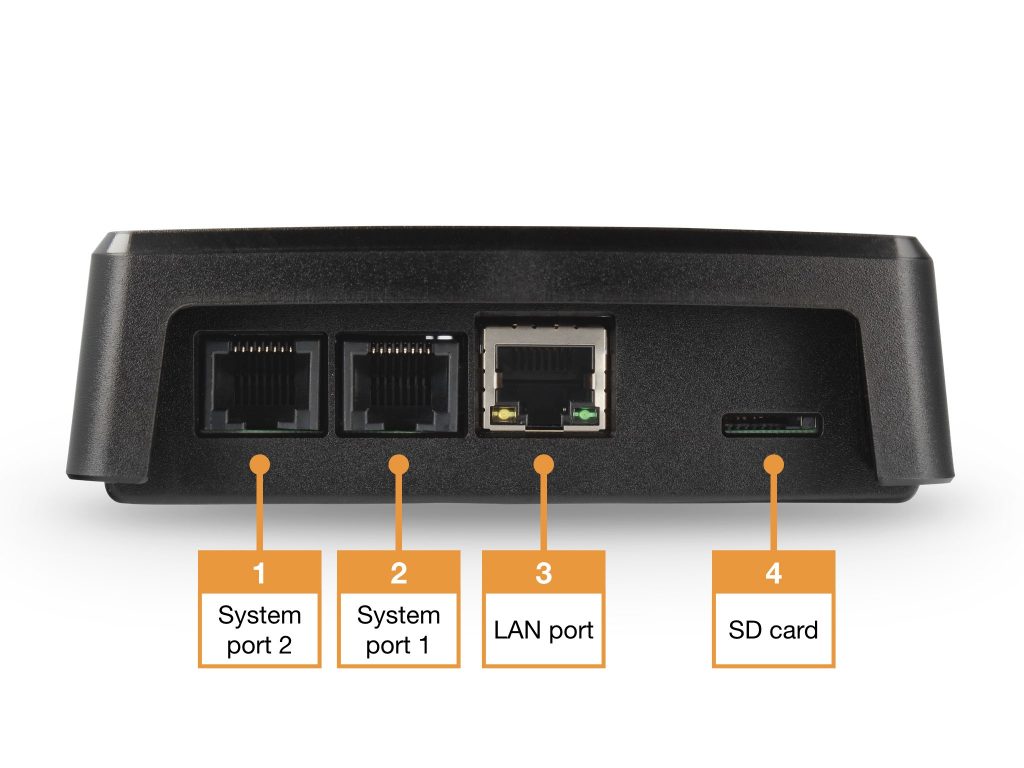
- System port (2) for connecting expansion sensors
- System port (1) for connecting expansion sensors
- LAN port (connection to network and power supply via PoE Class 2)
- Micro SD card (max. 128 GB, not included)
Inserting a SIM card
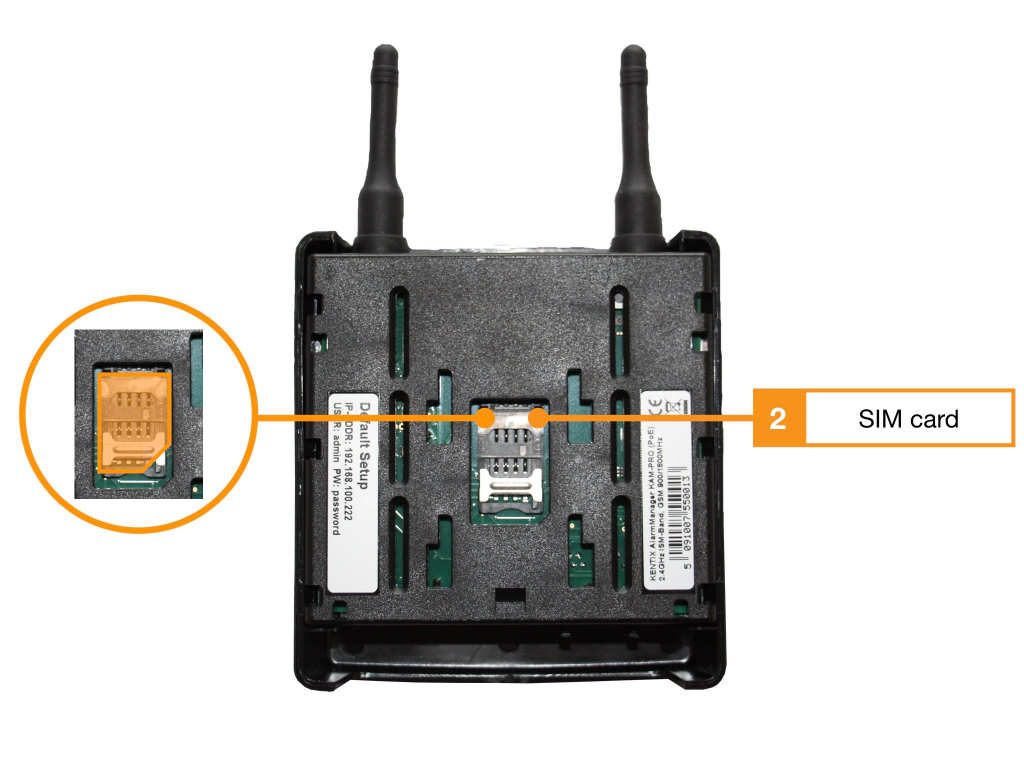
The SIM card holder is located on the bottom side of the board / rear side of the housing below the mounting holder. The mounting bracket can be removed without tools by slightly lifting the latch. To do this, press the holder slightly upwards and pull the holder downwards.
The card holder can then be unlocked and unfolded. The SIM card is then inserted into the opened part of the holder.
Connection of extensions at the system port
The two Kentix system ports on the AlarmManager can be used to connect additional system components such as leak sensors, door contacts, sirens or external alarms from UPS or air conditioners. The external sensors-actuators are connected via a network cable. The cable length should not exceed 20m. Most products are supplied ready for connection with cable.
A separately available connection adapter is available for connecting external alarms or devices with inputs or outputs: The KIO-3 with 2 digital inputs for floating contacts and 2 relay outputs.
The assignment of the system port
| System port (type: RJ45) | Assignment of the contacts |
|---|---|
 | 1. internal system voltage (GND) – not for external use* 2. output 1 (open collector, max. 100mA) 3. output 2 (open collector, max. 100mA) 4. external voltage 5. External voltage 6. Input 1 (potential-free wiring) 7. Input 2 (potential-free wiring) 8. Internal system voltage (5VDC) – Not for external use* * These connections are for internal use only |
Start the device and find it in the network
- Establish the power supply to the device.
- Connect your PC and the Kentix device to the same network and adjust the PC’s network settings if necessary.
- The device receives an IP address via DHCP from your network. At the same time the fallback address 192.168.100.22x (see sticker on the product) is active in factory settings.
- Find the device in the network: You can determine the address assigned by DHCP on your switch or by means of software such as “LanScan” for MacOS or “Advanced IP Scanner” for Windows. Search for a MAC address with “70:82:0e:xx:xx:xx”. Typically, the associated device name will also be “Kentix-72820e……“, with the last 6 digits in MAC and name assigned individually for their device.

- Call the determined IP address with a browser of your choice (“http://IpAdresse-des-Gerätes”).
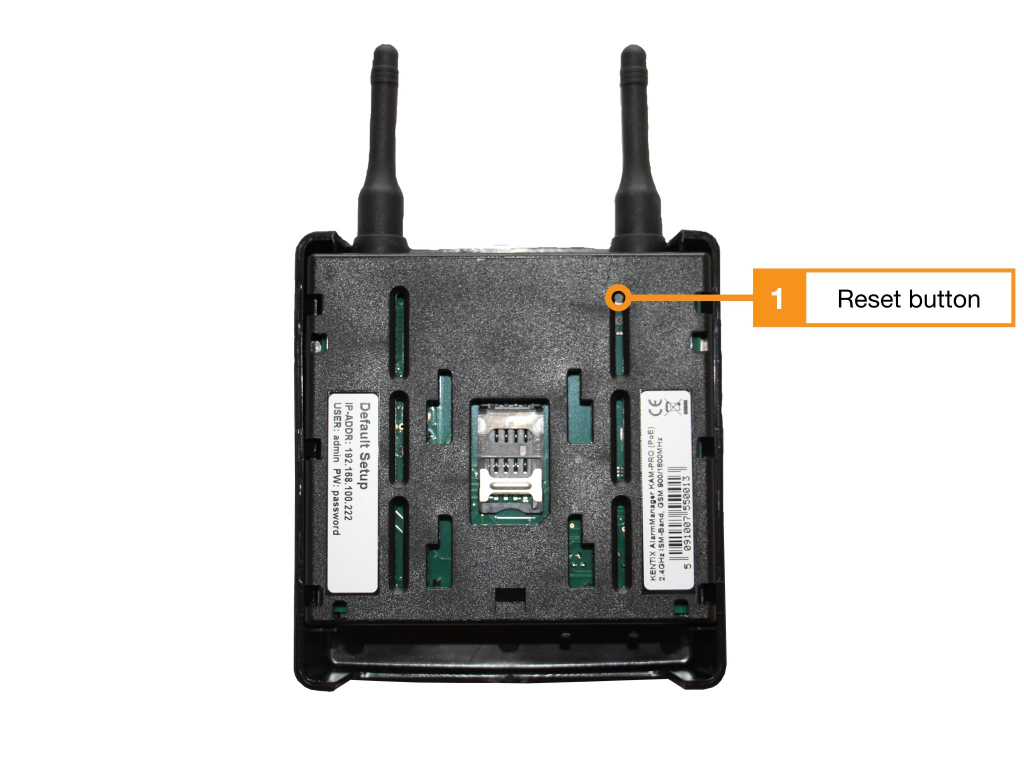
Load factory settings
- Restart the device (disconnect power and reconnect)
- The device will start and the status LED will light up for about 20 seconds and then turn off.
- After up to 60 seconds, the green status LED is permanently switched on again
- As soon as the internal status LED is permanently active green , press and hold the “RESET” key (1) with a suitable tool.
- Press and hold the button for 15 seconds until an acoustic feedback (“BEEP”) is given. During this time the status LED flashes green
- The device now loads the factory settings and restarts
- After approx. 60 seconds, the device can be reached with the factory settings. The status LED is permanently green again
Configuration with KentixONE
The device is configured via the web browser in KentixONE. The device must be accessible to the central KentixONE instance on the network side. Depending on the device type, a communication key and the IP address or DHCP name of the central KentixONE instance must also be set on the device (MultiSensors, AccessManager, SmartPDU). IP cameras or IO modules, on the other hand, can be integrated directly into KentixONE.
All information about the software is available in the KentixONE section and the related documentation.
Examples of extending a project with KentixONE
The basis: A StarterSet SmartMonitoring (radio)
To secure a room, a starter set is installed. A StarterSet SmartMonitoring radio contains an AlarmManager, a MultiSensor-LAN and a Multisensor-Door.
The MultiSensor-Door is connected to the system by radio and can be installed flexibly wherever it is needed.
Expansion modules
With the Kentix system port, I/O expansion modules such as the AlarmSirene or the leakage sensor (door contacts, switching contacts of other devices…) can be connected and the field of application of the sensors can be expanded, for example to include temperature monitoring of machines in production.
SmartAccess
The project will be extended with an access control system.
For this purpose, the StarterSet DoorLock-DC (radio) or a wall reader with Ethernet is simply integrated into the AlarmManger with the AccessManager.
SmartPDU
SmartPDUs are available in various designs. KentixONE is also installed here ex works. Installed in a server rack, depending on the model, they provide monitoring of the environment, the function of the computers, a measurement of power consumption with calibrated meters and control over the individual consumers. SmartPDUs work independently or are added to the AlarmManager.
Rack lock RA4 and AccessManager LAN
A rack lock RA4 is mounted in the rack.
An AccessManager LAN is installed.
MultiSensor-TI
A multisensor TI is installed.
SmartVideo
Kentix network cameras are installed. The cameras are assigned to the sensors that, when triggered, will cause images from the camera to be saved in KentixONE.
Network interfaces
With SNMP, ReST-API and Webooks, KentixOne provides interfaces for integration with other systems.
The documentation of these interfaces can be found here.
KentixONE-Go
KentixONE-GO extends the system with additional functions.
Solutions to frequently asked questions about Kentix products can be found in the general FAQ section.