
Datasheet SiteManager
Overview
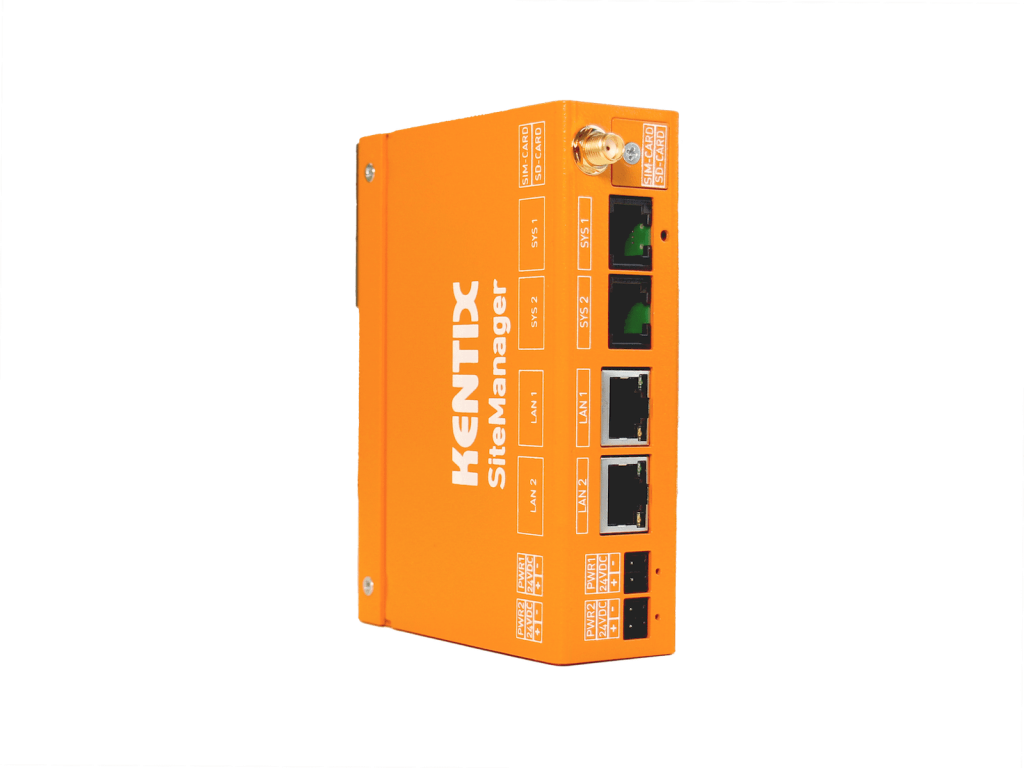
Kentix SiteManager is the central management unit for all Kentix installations. The SiteManager always works in the Main-Device operating mode and brings together all functional areas such as SmartAccess, SmartMonitoring, SmartPDU and SmartVideo. Up to 500 devices from different functional areas can be managed. It also includes the functionality of an alarm control center with various transmission paths (network, mobile radio) for alerting. The KentixONE software is already integrated via the integrated web server (HTTPS). Configuration is carried out via a web browser.
The SiteManager offers several installation options such as top-hat rail mounting on a 35 mm DIN rail or installation in a 19″ IT rack with one height unit.
Power is supplied via the integrated redundancy module with two external power supply units.
Safety instructions
Safety instructions
No modifications of any kind may be made to Kentix GmbH products, with the exception of those described in the relevant instructions.
When installing Kentix devices, certain degrees of protection must be guaranteed.
Observe the relevant regulations for installations in the respective environment.
Only operate the products within the defined temperature range.
The instructions should be passed on to the user by the person carrying out the installation.
Kentix accepts no liability for damage to the devices or components caused by incorrect installation. Kentix accepts no liability for incorrectly programmed units.
Kentix accepts no liability for faults, material damage or other damage.
moisture, dirt and damage during transportation, storage and operation.
Only operate the products within the defined temperature range.
Installation and battery replacement may only be carried out by trained specialist personnel in accordance with the instructions.
Do not charge, short-circuit, open or heat batteries.
Observe the correct polarity when inserting the batteries.
The devices must always be operated with the batteries intended for the product.
When changing the batteries, always replace all batteries.
Dispose of old or used batteries properly.
Keep batteries out of the reach of children.
Connection and operating elements
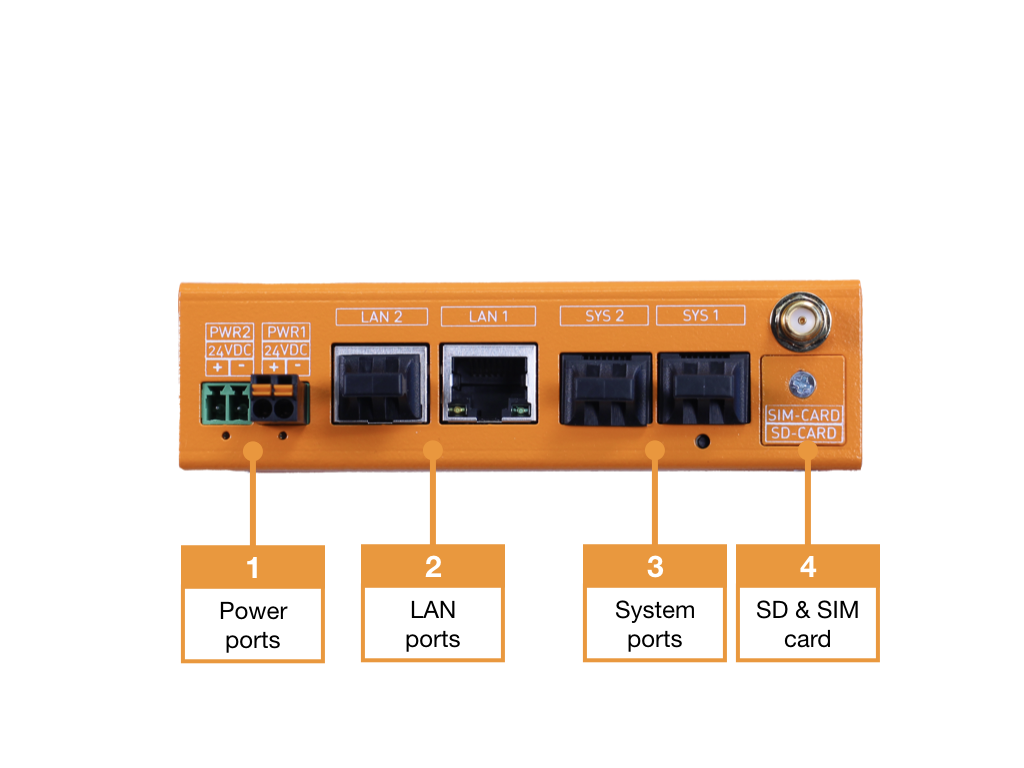
- Connection 1 and connection 2 for the power supply (24VDC) of the Kentix SiteManager
- 1GBit LAN connection 1 and 100MBit LAN connection 2
- System port 1 (type A) and system port 2 (type A) for connecting expansion sensors
- Nano SIM card (insert with the contacts facing downwards) and micro SD card (insert with the contacts facing upwards). Both card holders have a push-push locking mechanism.
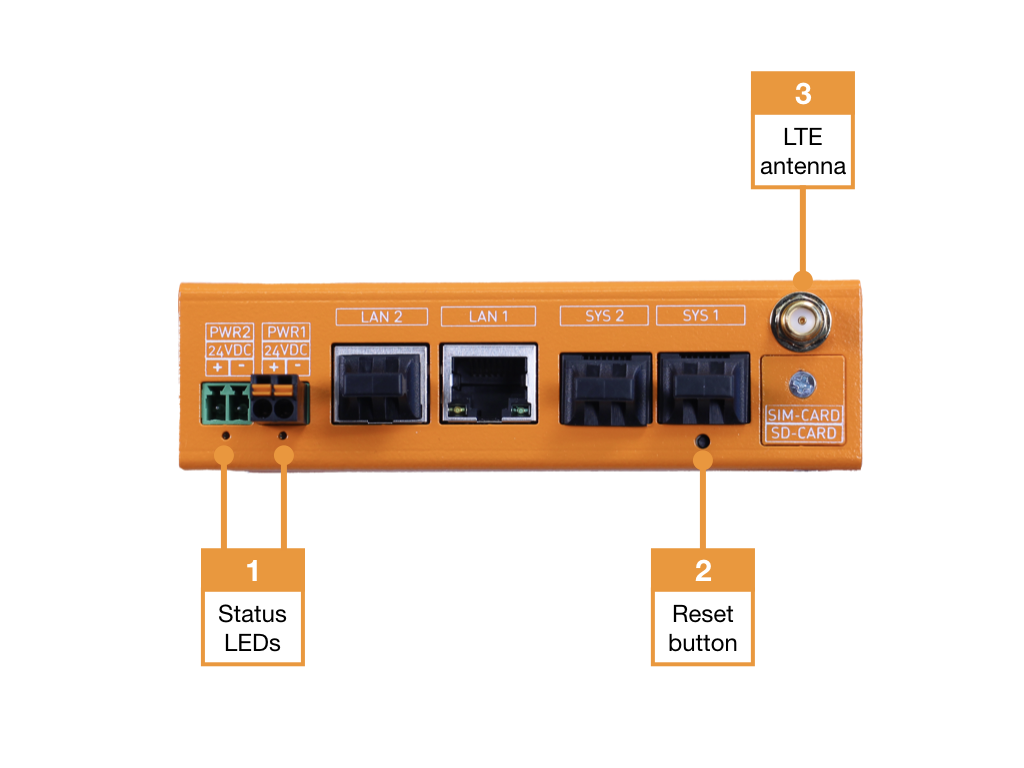
- Status LED 1 and status LED 2
- Reset button for resetting to factory settings
- SMA socket for connecting the included LTE/4G magnetic base antenna
Dimensions


Power supply
The power supply of the SiteManager is exclusively provided by external power supplies 24VDC / 0.5A. The integrated redundancy module offers the possibility to supply the SiteManager with two external power supplies. The power supply units are connected to the power supply connections on the SiteManager via a plug connector (WAGO part number: 714-102).
Installation options
The SiteManager offers various mounting options such as top-hat rail mounting on 35 mm DIN rails or installation in a 19″ IT rack with one height unit.
Mounting on TH 35-7.5 and TH 35-15 top-hat rails is carried out using the integrated quick-mounting bracket on the rear of the housing.
The supplied mounting brackets are required to install the SiteManager in a 19″ IT rack. These are screwed to the side of the housing with four M3x5 pan head screws. A screwdriver with TX10 hexagon socket is required for this purpose. In addition, the supplied Velcro strips for cable routing can be attached to the mounting brackets.
Factory settings
For initial configuration, use the IP address printed on the device or the address assigned via DHCP in a web browser (HTTPS). Please note the network settings of your connected PC.
The factory IP addresses at a glance:
| SiteManager and AlarmManager | 192.168.100.222 |
| MultiSensor | 192.168.100.223 |
| AccessManager | 192.168.100.224 |
| PowerManager | 192.168.100.225 |
| SmartPDU | 192.168.100.226 |
| Leakage sensor | 192.168.100.227 |
Reset to factory settings
- Restart the device (disconnect and reconnect the power supply).
- The status LED lights up briefly and then goes out.
- As soon as the status LED lights up green continuously, press and hold the reset button for 15 seconds until the device emits an acoustic feedback.
- The device loads the factory settings and performs a restart.
- After approx. 2 minutes, the device can be reached with the factory settings.
Configuration with KentixONE
The device is configured via the web browser in KentixONE. The device must be accessible to the central KentixONE instance on the network side. Depending on the device type, a communication key and the IP address or DHCP name of the central KentixONE instance must also be set on the device (MultiSensors, AccessManager, SmartPDU). IP cameras or IO modules, on the other hand, can be integrated directly into KentixONE.
All information about the software can be found in the KentixONE section and the associated documentation.