

DATASHEET KXC-RA2
Overview
The Kentix Door-Lock-RA2 is a battery operated electronic cabinet lock with radio. The cabinet lock is designed for locking and unlocking locks in locker and cabinet doors made of wood, steel and aluminum with thickness up to 20mm. The cabinet lock is designed exclusively for indoor use. RFID transponder carriers with MIFARE®Classic or MIFARE®DESFire® can be used as keys.
The electronic cabinet lock is networked by radio with an AccessManager radio. Up to 16 DoorLock radio components can be taught into one AccessManager radio. The configuration is done via the integrated web server of the main device (operating mode: Main-Device).
Safety instructions
No modifications of any kind may be made to Kentix GmbH products, with the exception of those described in the relevant instructions.
When installing Kentix devices, certain degrees of protection must be guaranteed.
Observe the relevant regulations for installations in the respective environment.
Only operate the products within the defined temperature range.
The instructions should be passed on to the user by the person carrying out the installation.
Kentix accepts no liability for damage to the devices or components caused by incorrect installation. Kentix accepts no liability for incorrectly programmed units.
Kentix accepts no liability for faults, material damage or other damage.
moisture, dirt and damage during transportation, storage and operation.
Only operate the products within the defined temperature range.
Installation and battery replacement may only be carried out by trained specialist personnel in accordance with the instructions.
Do not charge, short-circuit, open or heat batteries.
Observe the correct polarity when inserting the batteries.
The devices must always be operated with the batteries intended for the product.
When changing the batteries, always replace all batteries.
Dispose of old or used batteries properly.
Keep batteries out of the reach of children.
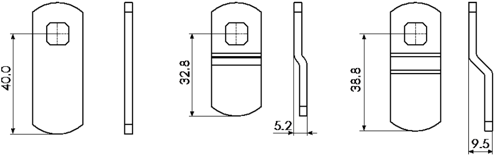
Dimensions

- DoorLock-RA2-XX

- DoorLock-RA2-23 with a 23 mm long locking bolt
- DoorLock-RA2-14 with a 14 mm long locking bolt
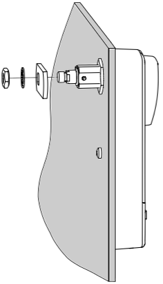
Components
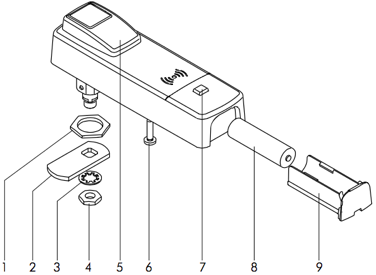
- Fastening nut for the cabinet lock on the door
- Closing lever (different variants available, included in delivery)
- Lock washer
- Fastening nut for the closing lever
- Operating lever
- Fixing screw
- Button for manual wake up
- Battery
- Battery compartment
Closing lever
For the different types of cabinets, the lock comes with 3 different locking levers. Here, after installation in the door and fixing the hardware to the door frame, it is necessary to check which of the variants fits best.
Installation
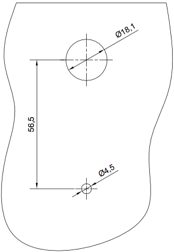
Drilling
To fix the cabinet lock, holes are required in the door according to the following drawing.
Setting the opening direction
The direction of rotation of the actuating lever is determined by the position of the small screw on the fastening thread.
Screw screwed in sideways. Opening by turning the operating lever to the left.

Screw in from below. Opening by turning the operating lever to the right.
Mounting
Push the cabinet lock through the hole in the door and fix it in place using the fastening nut and fastening screw.
Then fix the closing lever and the lock washer with the fastening nut.
If necessary, the profiles must be placed underneath before the fastening nut and fastening screw are screwed in.
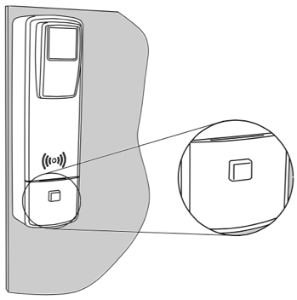
Wake up the online cabinet lock
Unlike the other smart access devices, the cabinet lock must be woken up from sleep mode by a button. This is required during initial setup as well as during normal operation.
To wake up, press the button until the LED lights up. Only then hold the RFID token in front of the reading content.
Mastercard set

The master card set is used to prepare the DoorLock devices with radio for operation. All IP wall readers that are connected via the SmartRelay are excluded. With the service key card, the radio components such as knobs, door handles or wall readers are integrated into the radio network and the communication is encrypted. Only one master card set is required per system or installation. We recommend using an extra set of master cards for each project.
Commissioning
Prepare device
Slide the enclosed battery (type AA Lithium 3.6V (ER14505)) into the handle or insert it into the battery holder.
Set up service key
- Hold the service key (yellow) for approx. 1 second in front of the pusher to activate it.
- Hold the service key again just in front of the pusher. The service key is now programmed.
User and access management
The administration of users and access rights is done on the main device of the installation with KentixOne.
All information about the software is available in the KentixONE section.
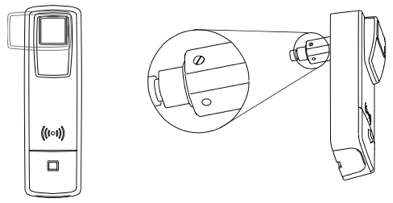
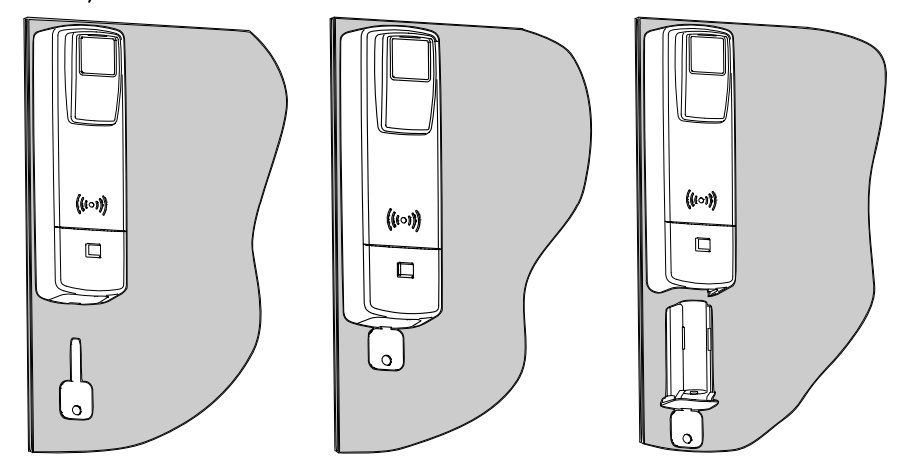
Open battery compartment
To open the battery compartment, a special key is required which is available separately.
Battery change
Open the battery compartment of the cabinet lock with the battery replacement tool. To do this, press the tool into the opening on the underside of the cabinet lock until the battery compartment can be removed.
Remove the used battery and insert a new one, paying attention to the polarity.
Push the battery compartment back in until it clicks into place.

Battery Maintenance Software
The DoorLock’s battery maintenance feature must be enabled in the KentixONE configuration interface, version 8.6.0 or later. After the initial setup of the DoorLock and after every battery replacement, this feature must be activated to ensure trouble-free operation. Afterward, at least one successful transaction must be completed to finalize the activation.
Signaling
| Function | Signal and explanation (868MHz) | Signal and explanation (BLE 2.4GHz) |
| First booking after commissioning | long tone and orange LED | long tone and orange LED |
| Programming mode start | Long tone followed by a short tone | Long tone followed by a short tone |
| Programming mode | LEDs flash green | LEDs flash blue |
| Programming mode end | short tone followed by a long tone | short tone followed by a long tone |
| Key taught | 2 short tones, LEDs light up green | 2 short tones, LEDs light up blue |
| Key authorized | LEDs light green | LEDs light blue |
| Key not authorized | long low tone, LEDs light up red | long low tone, LEDs light up red |
| Emergency access | no sounds, only the green LED flashes | no sounds, only the blue LED flashes |
| Battery warning phase 1 | 5 short tones, simultaneously LEDs flash 5x red | 5 short tones, simultaneously LEDs flash 5x red |
| Battery warning phase 2 | 5 short tones, at the same time LEDs flash 5x red, then 5s delay of engagement, at the same time LEDs flash green | 5 short tones, at the same time LEDs flash 5x red, then 5s delay of engagement, at the same time LEDs flash blue |
| Battery warning phase 3 | 5 short beeps, simultaneously LEDs flash 5x red, no engagement, but battery change position | 5 short beeps, simultaneously LEDs flash 5x red, no engagement, but battery change position |
| Coupling error | 5 short tones, 2 long tones. Contact support at support@kentix.com | 5 short tones, 2 long tones. Contact support at support@kentix.com |