
DATASHEET MULTISENSOR-TI
KentixONE Operating mode
| SiteManager Operation | Stand-alone operation |
|---|---|
Overview
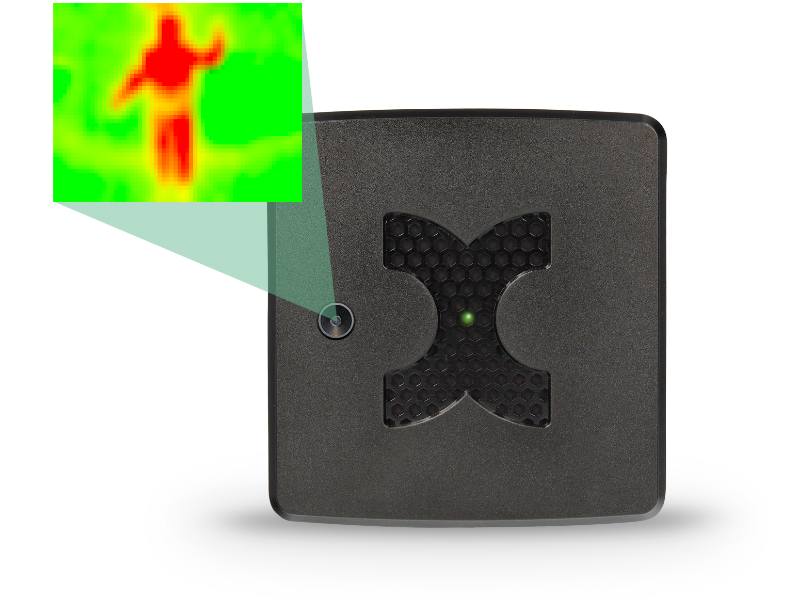
The MultiSensor-TI is equipped with thermal image sensor technology and integrates a large number of individual sensors in a compact device and monitors their measured values. The integrated thermal image sensor has a resolution of 1024px and can detect heat radiating objects (people, machines, equipment, etc.) in moving or static state and measure their surface temperature. The MultiSensor-TI is optimized for monitoring closed rooms and is typically mounted on or near the ceiling. The MultiSensor-TI is network-compatible and is supplied with power via Power over Ethernet (PoE).
The MultiSensor-TI can be operated as a stand-alone device (operating mode: Stand-Alone Device) or in a network (operating mode: Satellite Device) with other MultiSensor-TIs and other Kentix devices. The KentixONE software is already integrated via the integrated web server (HTTPS). Configuration is carried out via a web browser and, depending on the operating mode, locally on the MultiSensor-TI itself (operating mode: Stand-Alone Device) or on a central instance such as the SiteManager or AlarmManager (operating mode: Satellite Device).
In addition to the Ethernet network interface, the MultiSensor-TI has a BLE radio interface (2.4 GHz). Additional Kentix wireless sensors can be connected via these in the Satellite Device operating mode. The MultiSensor-TI then also works as an Ethernet wireless gateway, making it very easy to set up stable sensor networks. The wireless sensors can be distributed within a radius of up to 20m, depending on the structure of the building.
Safety instructions
No modifications of any kind may be made to Kentix GmbH products, with the exception of those described in the relevant instructions.
When installing Kentix devices, certain degrees of protection must be guaranteed.
Observe the relevant regulations for installations in the respective environment.
Only operate the products within the defined temperature range.
The instructions should be passed on to the user by the person carrying out the installation.
Kentix accepts no liability for damage to the devices or components caused by incorrect installation. Kentix accepts no liability for incorrectly programmed units.
Kentix accepts no liability for faults, material damage or other damage.
moisture, dirt and damage during transportation, storage and operation.
Only operate the products within the defined temperature range.
Installation and battery replacement may only be carried out by trained specialist personnel in accordance with the instructions.
Do not charge, short-circuit, open or heat batteries.
Observe the correct polarity when inserting the batteries.
The devices must always be operated with the batteries intended for the product.
When changing the batteries, always replace all batteries.
Dispose of old or used batteries properly.
Keep batteries out of the reach of children.
Environmental conditions
The Kentix MultiSensor-TI is not intended for outdoor use. Care must be taken to ensure that no sources of interference such as heaters, lamps or direct sunlight are in the infrared sensor’s field of view. Since the sensor also detects the temperature of the ground, care should be taken to ensure that it is not strongly illuminated by the sun.
Controls
Voorerseite
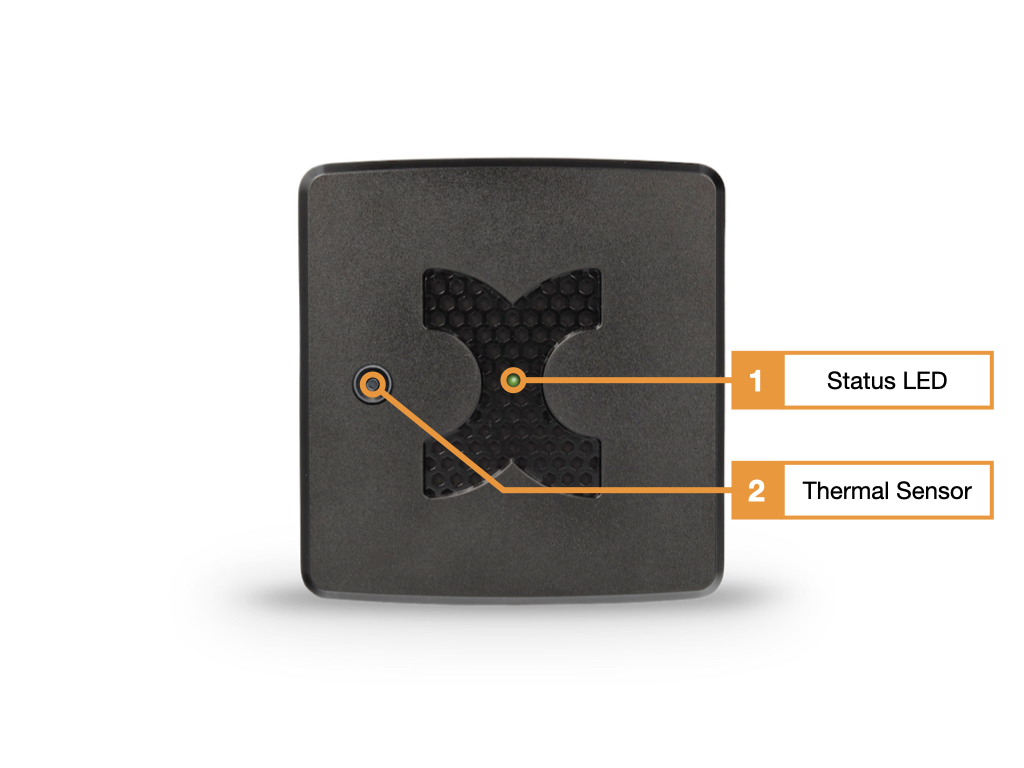
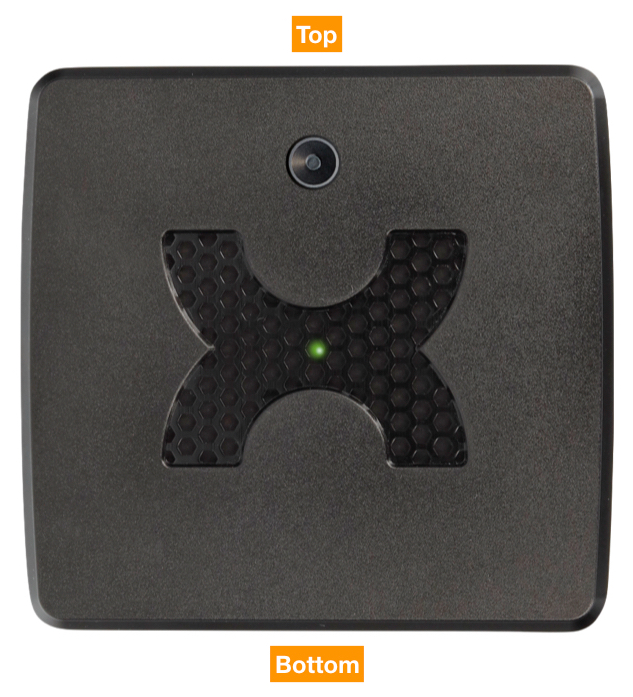
- Status LED :
GREEN: POWER OK, no alarms pending
RED: POWER OK, alarms pending - Thermal image sensor with corresponding optics
40°x40° field of view (ART: KMS-TI-40-B)
90°x90° field of view (ART: KMS-TI-90-B)
Back
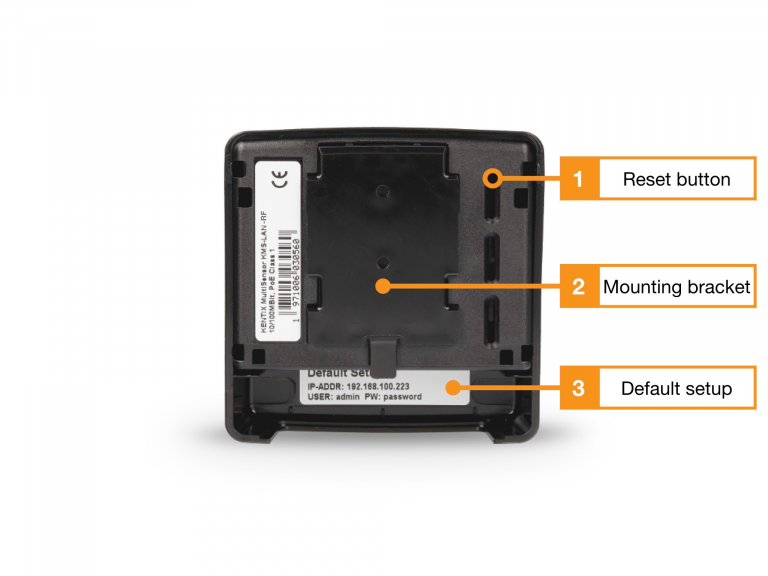
- Reset button (factory settings)
- Mounting bracket
- Default Setup sticker (IP address, MAC address, access data)
Connections
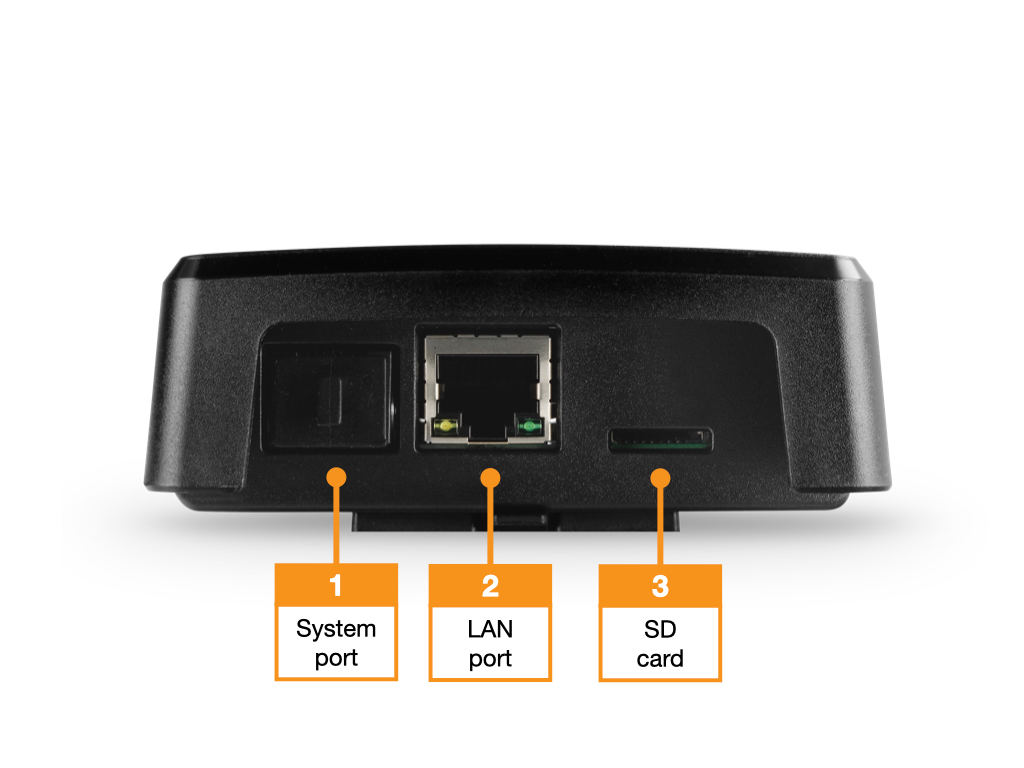
- Kentix system port (type A)
- LAN port: network and power supply via PoE (Class 2)
- SD card slot: Micro SD cards up to 128GB (not included)
Connection of extensions at the system port
Additional system components such as leakage sensors, door contacts or external alarms from UPS or air conditioning units can be connected via the Kentix system port. The system port has 2 digital inputs and 2 digital outputs which are available via a RJ45 socket.
An extension module (ORDER CODE: KIO3) is required to connect external alarms. Above this, 2 potential-free contacts and 2 changeover relays can be wired.
A commercially available network patch cable (unshielded/shielded) with a length of up to 20 m can be used as the cable connection between the Kentix system port and the system component.
The assignment of the system port
| System port (type: RJ45) | Assignment of the contacts |
|---|---|
 | 1. Internal system voltage (GND) – Not for external use* 2. Output 1 (open collector, max. 100 mA) 3. Output 2 (open collector, max. 100 mA) 4. External voltage / BUS (depending on device type) 5. External Voltage / BUS (depending on device type) 6. Input 1 (Potential-free connection) 7. Input 2 (Potential-free connection) 8. Internal System Voltage (5/24 VDC) – Not for external use* * These connections are intended for internal use only |
Connection of a leakage sensor to the system port

- Leakage sensor
- MultiSensor
The leakage sensor is connected directly to the system port of the MultiSensor.
Connection of an alarm siren to the system port
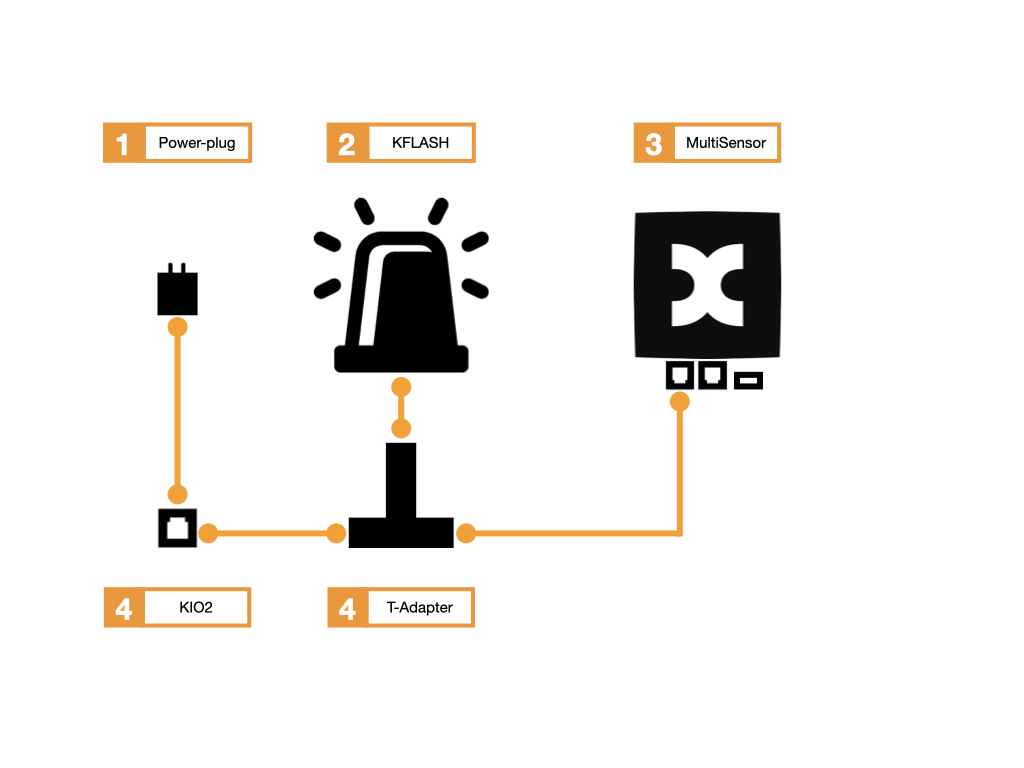
- 24V DC power supply unit
- Alarm siren
- MultiSensor
- KIO2
- RJ45 T-adapter
The alarm siren is supplied with 24V DC via the KIO2 expansion module and a power supply unit. The alarm siren is also connected to the MultiSensor via the RJ45 T adapter.
Connection of a leakage sensor and an alarm siren to the system port
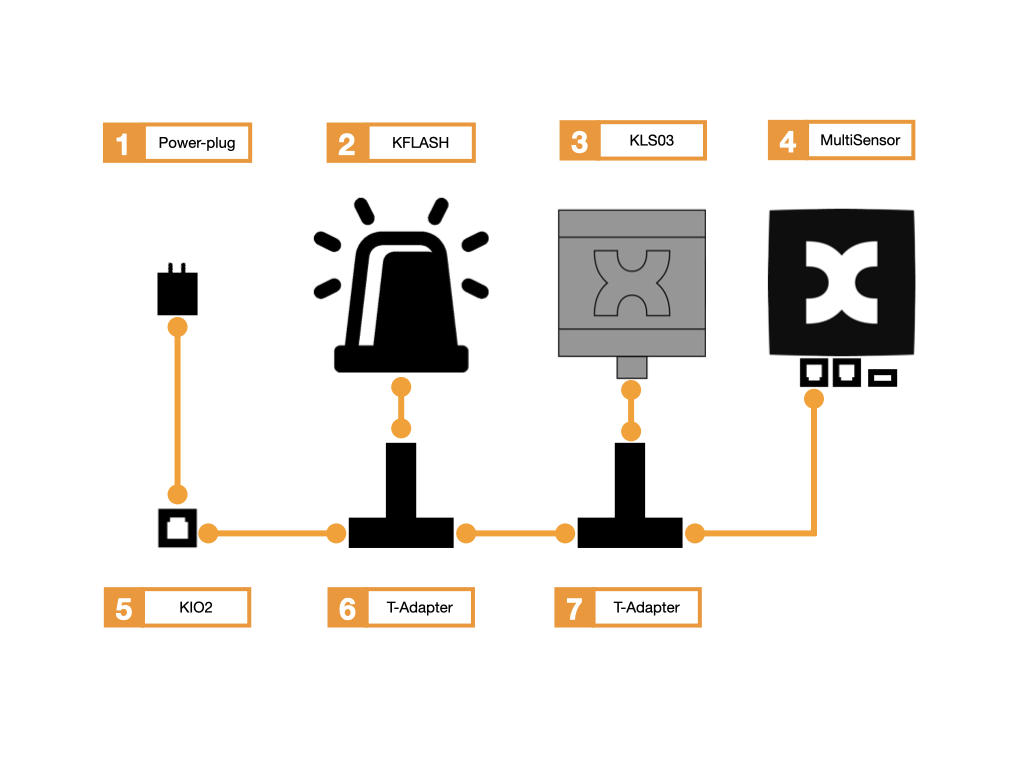
- 24V DC power supply unit
- Alarm siren
- Leakage sensor
- MultiSensor
- KIO2
- RJ45 T-adapter
- RJ45 T-adapter
The alarm siren is supplied with 24V DC via the KIO2 expansion module and a power supply unit. The alarm siren is also connected to the MultiSensor via two RJ45 T-adapters. The leakage sensor is also connected to the second T-adapter.
Factory settings
For initial configuration, use the IP address printed on the device or the address assigned via DHCP in a web browser (HTTPS). Please note the network settings of your connected PC.
The factory IP addresses at a glance:
| SiteManager and AlarmManager | 192.168.100.222 |
| MultiSensor | 192.168.100.223 |
| AccessManager | 192.168.100.224 |
| PowerManager | 192.168.100.225 |
| SmartPDU | 192.168.100.226 |
| Leakage sensor | 192.168.100.227 |
Reset to factory settings
- Restart the device (disconnect and reconnect the power supply).
- The status LED lights up briefly and then goes out.
- As soon as the status LED lights up green continuously, press and hold the reset button for 15 seconds until the device emits an acoustic feedback.
- The device loads the factory settings and performs a restart.
- After approx. 2 minutes, the device can be reached with the factory settings.
Assembly instructions
When installing the Kentix MultiSensor-TI, it is important to consider the application for which the device is to be used and the area to be monitored. Based on this, attention must be paid to the following aspects before mounting the device.
When used for early fire detection
Alignment
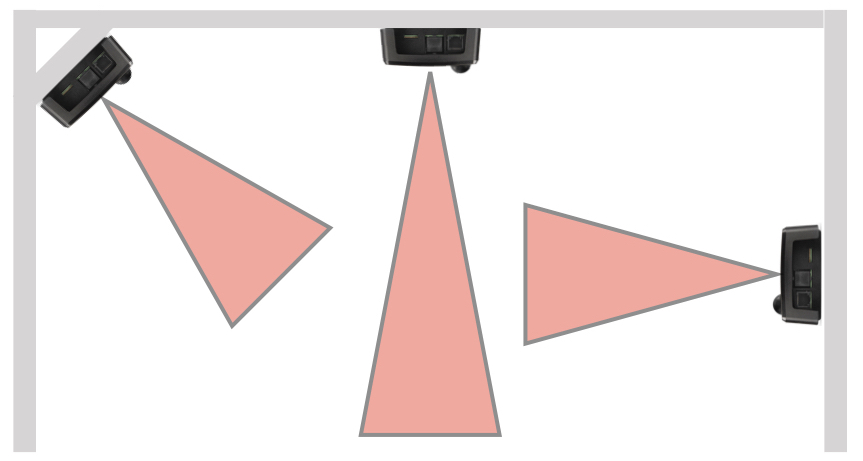
The Kentix MultiSensor is oriented so that when viewed head-on, the lens is at the top. If this is not possible for certain reasons, the thermal image can be rotated in the web interface.
The sensor can also be mounted at an angle or vertically on a wall for early fire detection. Optimal alignment is promising in this respect. It is advisable to align the center of the field of view. This can be done with the help of a warm object (candle, coffee cup, hot plate, etc.) and the live image of the infrared sensor. The scale that can be switched on in the live image can help with correct positioning.
Mounting/mounting height
For early fire detection, we recommend a mounting height of between 0.5 m and 5 m! The pixel size of the thermal image must always be taken into account when determining the mounting height.
The supplied mounting bracket is used for mounting. Optionally, mounting brackets can also be used for this purpose.
Basics of infrared measurement technology
Infrared measurement technology is the non-contact measurement of surface temperatures. Any object with a temperature above 0 Kelvin (-273.15 °C) emits infrared waves. These light waves move in a wavelength range from 780 nm to 3 mm.
A distinction is made between three ranges in infrared measurement:
- Near Infrared (NIR) region: Includes wavelengths between 750 nm to 2.5 μm
- Mid-infrared range (MIR): Includes wavelengths between 2.5 μm to 25 μm
- Far Infrared Range (FIR): Includes wavelengths between 25 μm to 3 mm
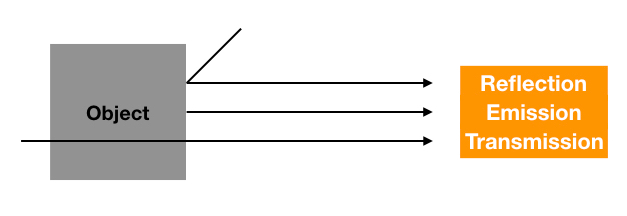
Emission, reflection and transmission
Emission is the radiation emitted by the measuring body. The emissivity (ε) describes the ability of an object to emit infrared radiation. The emissivity of the skin, for example, is on average ε=0.98.
Reflection describes external radiation which is reflected by the measuring body. The reflectance (R) defines the ability of an object to reflect infrared radiation from its surface. This depends on the surface finish as well as the material.
Transmission describes the ability of a measuring body to transmit infrared radiation. The transmittance (τ) depends on the thickness and type of material.
Advantages of infrared measurement technology
- Infrared measurement is particularly suitable for dynamic and rapidly changing processes
- State-of-the-art technology with reliable microprocessor technology
- Temperatures of very hot temperatures can be measured
- Temperature measurement without influencing the contact surface
- Contactless measurement of temperatures of various measuring objects
Temperature measurement by infrared radiation
As already described, every object above the absolute zero point of 0 Kelvin (=-273.15 °C), emits infrared radiation. The higher the temperature of the measured object, the higher its infrared radiation.
This radiation can be recorded with an infrared pyrometer and output as a temperature value. The radiation emitted by the target is picked up by a lens of the pyrometer. The lens projects the radiation onto a sensor.
This sensor converts the infrared radiation into an electrical signal. This is amplified and evaluated by a microprocessor. This processor calculates the temperature of the measured object from the recorded radiation and the ambient radiation, taking into account the emissivity.
Measurement with infrared sensors is an optical measurement method. For this reason, care must be taken to ensure a clean measurement environment. Dust, steam, etc. are disturbance variables and can lead to deviations and measurement errors.
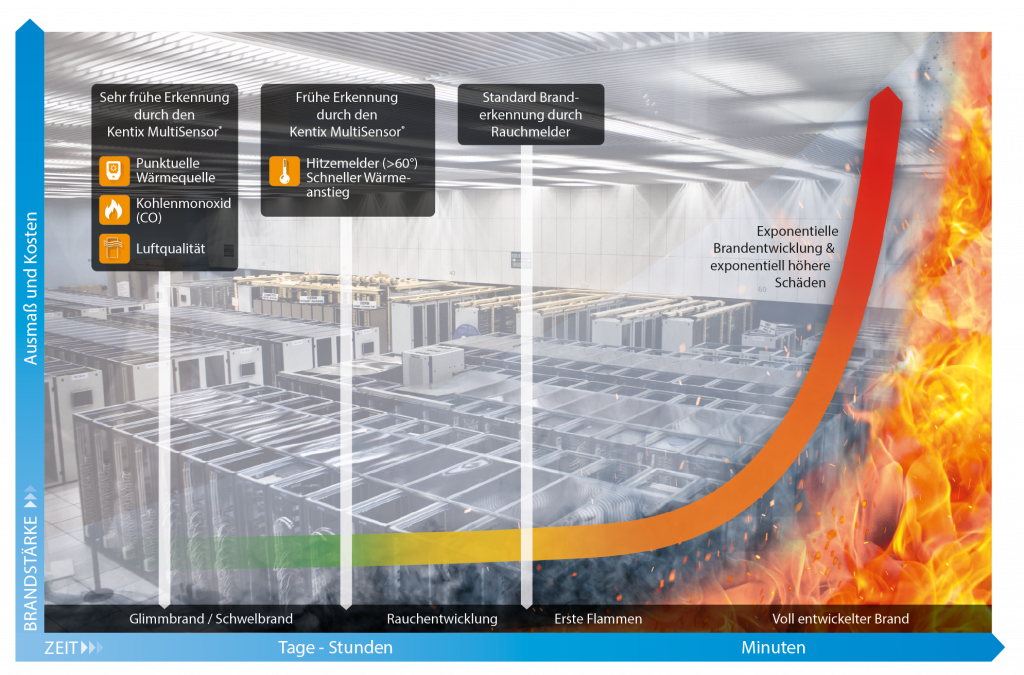
4-factor early fire detection
Fires can be caused by different reasons. Faulty electronics can cause glow and smolder fires to spread and develop over hours and days. In order to monitor a room or area not only for high surface temperatures but also for gases generated, early fire detection is an important preventive measure.
The 4 factors of early fire detection by the new Kentix MultiSensor-TI are explained and defined in detail below.
1st factor: surface temperature

Very hot surface temperatures emit strong infrared rays. This radiation is recorded by the MultiSensor-TI with an infrared sensor and output as a thermal image. In this way, different temperature ranges in rooms or on machines can be determined very precisely. If these hotspots exceed a certain value, a timely alarm is issued. The surface temperature can only be measured in the direct viewing window of the infrared sensor. Hidden or internal temperature hotspots are not detected, or are only detected when the surface is reached.
2nd factor: CO gas detection

Carbon monoxide (CO) is a tasteless, odorless, colorless, and toxic gas. Carbon monoxide is formed during the incomplete combustion of various carbon-containing substances without sufficient oxygen supply. These burns can occur over a long period of time. Even before smoke or even flames become visible, the Kentix MultiSensor-TI detects the CO gas and triggers an alarm.
When carbon monoxide is absorbed by the human body, the carbon atoms enter the blood. Carboxyhemoglobin is formed there. This impedes the oxygenation of hemoglobin. Thus, not enough oxygen can be absorbed by the blood (hypoxia).
Possible human sequelae due to carbon monoxide exposure are listed in the following table:
| Carbon monoxide value in parts-per-million (ppm) | Consequence in humans |
|---|---|
| 200 ppm (0.02%) | Headache, fatigue, dizziness, nausea |
| 400 ppm (0.04%) | Headache, life threatening after 3 hours |
| 800 ppm (0.08%) | Dizziness, nausea and cramps within 45 minutes |
| 1600 ppm (0.16%) | Headache, dizziness and nausea after 20 minutes, unconsciousness within 2 hours, death possible within one hour. |
| 3200 ppm (0.32%) | Headache, dizziness and nausea after 5 minutes. Death within 30 minutes |
| 6400 ppm (0.64%) | Headache, dizziness and nausea after 1-2 minutes. Seizures, respiratory arrest, and death in less than 20 minutes. |
| 12800 ppm (1.28%) | Unconsciousness after 2-3 breaths, death in less than 3 minutes |
3rd factor: air quality

The Kentix MultiSensor-TI detects a rapid change in the air quality in a room. As soon as a strong air pollution is detected, which can be caused by various reasons, an alarm is signaled. In contrast to surface temperature detection, the air quality sensor monitors not only the direct viewing window, but also concealed areas around the environment. The MultiSensor-TI detects the levels of volatile organic compounds (VOCs for short) and can thus determine an Indoor Air Quality Index (IAQ).
Although the IAQ index provides important information on indoor air quality, it is not sufficient on its own to be used as an early fire detection system. There is no direct relationship between the IAQ index and the possibility of fire.
However, it is possible to use the IAQ index as supplementary information in monitoring buildings and ensuring good air quality. Good air quality can help minimize the risk of fire by reducing the likelihood of ignition or explosion from combustible materials.
The following table shows the different levels of air quality rated by your Indoor Air Quality index (IAQ).
| IAQ Index | Air quality | Effects (long-term exposure) | Proposed measure |
| 0 – 50 | Excellent | Clean air; the best for the well-being | No measures required |
| 51 – 100 | Good | No irritation or effects on well-being | No measures required |
| 101 – 150 | Lightly soiled | Reduction of the well-being possible | Ventilation proposed |
| 151 – 200 | Moderately dirty | Clearer irritation possible | Increase ventilation with clean air |
| 201 – 250 | Heavily soiled | Depending on the type of VOCs, exposure can lead to effects such as headaches | Improve ventilation |
| > 250 | Very heavily soiled | More serious health problems possible if harmful VOCs are present | Contamination should be identified when level is reached even without people present; maximize ventilation & reduce presence |
The Indoor Air Quality Index (IAQ) can aid in early fire detection by identifying changes in air quality that indicate a potential fire hazard.
The IAQ index is based on various factors such as the concentration of carbon monoxide, carbon dioxide, volatile organic compounds (VOCs). If the values of these factors change drastically, it may indicate that something in the environment is burning or about to burn.
High readings according to the IAQ index can indicate possible incipient fires or smoldering fires at the very earliest stage. Even when heated, plastics release many particles into the ambient air, which directly affect the IAQ readings. As soon as another factor, in addition to the IAQ index, such as CO, surface temperature or air temperature exceeds the set threshold, the fire probability increases sharply.
| IAQ Index | Air quality |
|---|---|
| <300 | Possible early fire indicator if the value is present for a longer time and increases (>36h) |
| >300 | Possible early fire indicator if the value is present for a longer time and increases (>24h) |
| >400 | Possible early fire indicator if the value is present for a longer time and increases (>12h) |
| >500 | High fire probability in connection with further factor (CO, temperature) |
4th factor: air-room temperature
The integrated temperature sensor measures the increase in air temperature in a room. If the value rises sharply in a very short time and exceeds a defined threshold value, the Kentix MultiSensor-TI triggers a temperature alarm.
Calibration of the room temperature measurement
Kentix MultiSensors record all important environmental values of a room, including the room temperature. In order to achieve the most accurate temperature possible and to trigger an alarm if the room temperature exceeds the limit value, we recommend calibrating the temperature measurement at the final installation location. This is especially necessary for sensors with Ethernet (PoE) connection, since a certain intrinsic heat falsifies the measurement. For MultiSensors with radio and battery supply, the influence of the intrinsic heat is not present.
However, in order to obtain a good measurement result with reproducible measured values in the event of an alarm, the MultiSensor should be calibrated to the respective installation location after installation. To do this, the temperature in the immediate vicinity (approx. 5-10 cm away) of the MultiSensor must be measured comparatively with a room thermometer that is as accurate as possible. If there is a deviation in temperature between the MultiSensor and the thermometer, the temperature value can be corrected. This is done by entering the determined temperature difference between the MultiSensor and the room thermometer as a correction offset in the KentixONE software. The correction also has a direct influence on the measurement of the relative humidity and on the dew point calculation of the MultiSensor.
| Step | Note |
|---|---|
| Install MultiSensor at the destination. | The position and orientation of the sensor should not be changed afterwards. Please note the following: – Mount with the X air opening facing downwards – Do not mount in the air flow – Ventilation vents of the sensor must be unobstructed |
| Perform configuration of the MultiSensor with Kentix ONE. | |
| At the earliest 30 minutes after commissioning , adjust the temperature of the MultiSensor to the room temperature. | To do this, measure the temperature with an external reference thermometer in the immediate vicinity, approx. 5-10 cm from the MultiSensor. It should be noted that this thermometer also acclimatizes to the room and displays the correct room temperature only after a few minutes. |
| If a difference between the MultiSensor and the thermometer is detected, this can be entered in the “Offset” field in the KentixONE configuration of the MultiSensor. After saving, the sensor then provides the corrected measured value. | The offset can only be specified by whole degrees, i.e. without decimal places. This results in an accuracy for the temperature of +/- 0.5 degrees. |
Configuration with KentixONE
The device is configured via the web browser in KentixONE. The device must be accessible to the central KentixONE instance on the network side. Depending on the device type, a communication key and the IP address or DHCP name of the central KentixONE instance must also be set on the device (MultiSensors, AccessManager, SmartPDU). IP cameras or IO modules, on the other hand, can be integrated directly into KentixONE.
All information about the software can be found in the KentixONE section and the associated documentation.