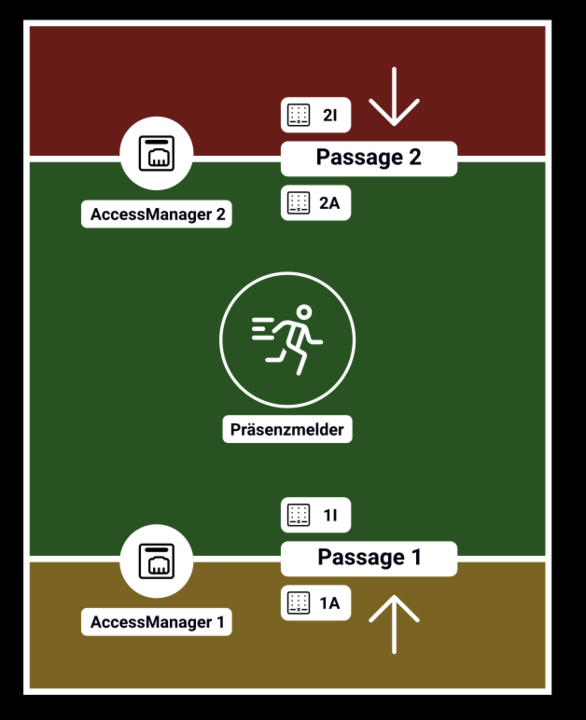
The interlock function is used to control two or more doors so that only one door can be opened at a time. This serves to increase security by preventing unauthorized persons from entering a secured area. The interlock function is often used in high-security areas to ensure that only authorized persons are granted access. An additional presence detector can be used to prevent other people from entering the interlock area. A license for KentixONE Plan, at least the “L” version, is required for the interlock function.
Prerequisites
The minimum requirements for using the lock function are
- KentixONE from version 8.5.0
- KentixONE Plan “L”
- Two AccessManger LAN (KXP-2RS) with two wall readers each
- One door contact on each AccessManager
- Optional : Presence detector or camera to separate people
Functional description
The interlock function prevents the simultaneous opening of the passageways on both opposite sides of the interlock chamber. In the example below, these are passageways “1” and “2”. This is made possible by the combination of door contacts on the passageways and the “interlock function” software function. An additional presence detector can be used as an option. If the interlock function has been set up as described below, no further changes to the settings are necessary. The software takes over the control automatically.

Furnishings
Create alarm groups
Three alarm groups are required, which represent the areas (zones) of the interlock and separate these areas by the respective passages. In the example: “Outside 1”, “Inside 1-2” and “Outside 2”
Activate function
The interlock function is activated in the “Inside 1-2” interlock group in the alarm group settings.
Add AccessManager LAN
The AccessManagers used are added to the alarm group of the interlock zone, here “Inside 1-2”
In the AccessManager, “V2” must be selected in the “Configuration” -> “Communication” area under “Wall reader” -> “DoorLock version”. This setting must be made directly on the AccessManagers.
Set up wall reader
The wall readers are assigned to the alarm groups according to their positions.
- Reader 1 Outside : Group “Outside 1”
- Reader 1 Inside: Group “Inside 1-2”
- Set up the door contact on AccessManager 1 in the settings of the wall scanner in the “Door closing notification” function.
- Reader 2 Inside: Group “Inside 1-2”
- Set up the door contact on AccessManager 2 in the wall reader settings in the “Door closing notification” function.
- Reader 2 Outside: Group “Outside 2”
Create passages
- Create a passage with “Add device”–>”SmartAccess”. Add readers “Outside 1” and “Inside 1”.
- Create another passage. Add readers “Inside 2” and “Outside 2”.
Use optional presence detector
- Connect presence detector to AccessManager 1 or 2 with digital input 2.
- Assign the digital input 2 used to the “Inside 1-2” alarm group.
- If a signal from the presence detector is present at digital input 2, opening the access doors into the interlock zone from the outside is prevented.
Possible extensions
This function can be expanded to include additional access points. The AccessManagers and wall readers are then assigned to the corresponding alarm groups for the zones.